I can’t say I’m a lumberjack or anything of the sort; but I have felled a tree or two in my day with whatever tool I had available, chainsaw, axe, hand saw, or even stones in my youth as we attempted to recreate the Neolithic era. I grew interested in technique, which I had read about techniques in Back to Basics. Later a buddy of mine told me about working for the forest service and getting so good with a chainsaw while thinning the woods that he could drop a tree on a I dime every time.
So below you will find some simple diagrams and comments provided by people with experience.
The Chain Saw:
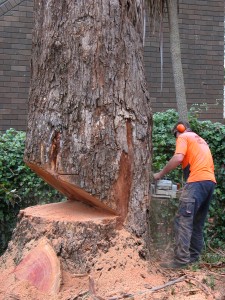
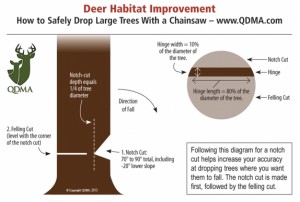
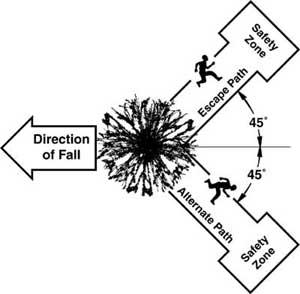
From qdma.com here is a great excpert from their news letter on felling trees with chain saws and a great diagram. Following the instructions in the diagram, you make a “notch cut” first, and you make this cut on the side of the tree that faces the direction you want the tree to fall. Then, you make the felling cut, leaving a hinge. The hinge holds the tree to the stump during most of the tree’s fall, and it guides the tree in the intended direction.
The length of the hinge should be 80 percent of the diameter of the tree. For example, on a 20-inch diameter tree, the hinge should be 20 inches x 80% = 16 inches. The thickness of the hinge should be 10 percent of the diameter of the tree. For example, on a 20-inch diameter tree, the hinge should be 20 inches x 10% = 2 inches.
Not only does this method help ensure the tree falls where you want it to, it greatly reduces the possibility of any surprises, like splits, butt-kicks and barberchairs.
Obviously, even a notch cut can’t make a tree fall in a certain direction if the tree is leaning heavily the other way (at least not without the use of wedges and a lot of expertise). And, anytime you use this method, once the tree begins to lean into the notch cut, remove the saw, stop the engine, and walk quickly away from the falling tree along a planned, cleared path of escape at a 45 degree angle from the falling tree. Even notch-cut trees can snap, roll or jump as they hit the ground, and it’s best to be at least 20 feet from the stump and behind a standing tree if possible.
The Axe:
From an article on doityourself.com I pulled out these great steps for felling trees with axes.
Step 1 – Select the Right Axe for You and the Job
Be sure you have the right axe for the job. A felling axe is used for chopping logs or trees perpendicular to the grain. There are 2 types of felling axe: a rounding axe is used on hardwoods and a wedge axe is used on softwoods. The handle of a felling axe is typically 31 to 36 inches long. Choose an axe that you will be comfortable with–not too light and not to heavy.
Step 2 – Anticipate the Direction the Tree Will Fall
Try to get the tree to fall in the direction of the prevailing wind. Consider also the direction in which the tree leans if it is not exactly vertical. Keep all your belongings clear of the area where the tree is expected to fall. To be on the safe side, make sure that any vehicles are parked outside of a radius equal to the height of the tree. Plan an escape route at least 45 degrees from the direction of the falling tree.
Step 3 – Start a Notch
Cut a V-shaped notch (kerf) about waist high into the tree in the direction you want the tree to fall. Cut to a depth of about 1/3 the diameter of the tree.
Step 4 – Start the Felling Cut
Cut another notch on the opposite side about a foot above the first. The wood between the 2 cuts creates a “hinge” holding the tree in place as it begins to fall.
Step 5 – Continue to Cut into the First Notch until the Tree Begins to Fall
Expand the width of the first notch in an upward direction until it approaches the height of the second notch. When the tree begins to fall, make your way to safe distance back along the escape route. Be aware of any branches on nearby trees that might become entangled with the falling tree.
The Handsaw:
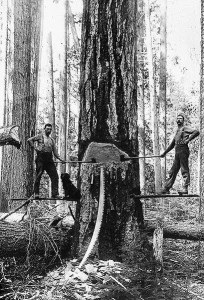
This method is synonymous with the chainsaw as far as how to cut the tree, with the exception of using a little more elbow grease. From an article written by Karie Lapham Fay on ehow.com I gleaned these comments.
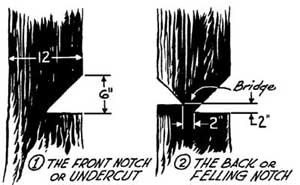
Cut a horizontal cut low on the “front” of the tree, going through about 40 percent of the tree’s thickness. Work the saw back and forth to create the cut, applying firm and steady pressure. Make another cut just above the first, coming down at an angle so the two cuts meet like a piece of pie removed from the rest. Avoid cutting through more than 40 percent of the tree or it may fall prematurely.
Move to the back of the tree and locate a spot on the tree about 2 or 3 inches above the tip of the pie cut. Make a “back cut” at this point, parallel to the pie cut and to the ground as well. Make sure you are indeed above the first cut before cutting, or you will be unable to control the direction of the fall.
Continue cutting through the tree trunk until the tree begins to fall. This will not take cutting through the entire trunk, or even half way through; as the joint where the middle of the tree remains, between the back cut and pie cut, narrows, the remaining wedge will weaken and give way. Calmly step away from the tree and wait for it to fall; this should prove to be away from you if you have cut it correctly.
Well all; be safe and have fun felling trees for whatever reason you need to fell trees.
Jon


Leave a Reply