I had a discussion with two relatives that led me to a stark realization; those without military or medical training tend to have a serious void in potential life saving information and technique. I asked the two unnamed relatives if they knew how to recognize arterial bleeding and how and where to apply a tourniquet. They looked back with blank stares having never thought about the question despite it being one of the simplest ways to save a person’s life in an emergency.
So here is a quick refresher for those with knowledge, and a potential life saving lesson for those who are unfamiliar with the topic. Most of the information is coming straight out of the Edition C, Combat Lifesaver Course: Student Self-Study, SUBCOURSE IS0871. Please track one down and keep it with your survival kit as it may save your or another’s life.
5-8. DETERMINING IF A TOURNIQUET IS REQUIRED
A tourniquet is a constricting band placed around an extremity to stop arterial bleeding by stopping blood circulation to the part of the limb below (distal to) the tourniquet. A tourniquet is only used on an arm or leg where there is a danger of the casualty bleeding to death.
WARNING
A tourniquet is not used for wounds to the head, neck, or trunk (chest and abdominal area).
a. Wound on an Extremity. Bleeding from a major artery of the thigh, lower leg, or arm and bleeding from multiple arteries may prove to be beyond control by the methods discussed in Section I. If the pressure dressing under firm hand pressure becomes soaked with blood and the wound continues to bleed, apply a tourniquet.
NOTE: The tactical situation may not allow the time or safety for conventional methods of controlling the bleeding. The recommended means to control bleeding in a tactical environment while under fire is a rapidly applied tourniquet. Once you and the casualty have reached safety, consider loosening the tourniquet (do not remove the tourniquet) and using direct pressure and/or a pressure dressing to control the hemorrhage. If the tourniquet has been in place for more than six hours, do not remove the tourniquet.
REMEMBER
If you are unable to control bleeding except with a tourniquet, it is better to sacrifice a limb than to lose a life due to excessive bleeding.
b. Amputation.
(1) An amputation may be complete (the limb is completely severed) or partial (the two parts of the limb remain connected by some skin). Both require a tourniquet. Both involve bleeding from multiple arteries and are beyond control by the methods discussed in Section I.
(2) A person whose arm or leg has been amputated may not be bleeding when first discovered, but a tourniquet should be applied anyway. This absence of bleeding is due to the body’s normal defenses (contraction and clotting of blood vessels) as a result of the amputation. However, bleeding will start when the blood vessels relax or if the clot is knocked loose while moving the casualty.
5-10. APPLYING AN IMPROVISED TOURNIQUET
In the absence of a specially designed tourniquet, such as the CAT, a tourniquet may be made from a strong, pliable material such as gauze, a muslin bandage, or a strip of material torn from clothing. An improvised tourniquet is used with a rigid stick-like object to act as the windlass rod. To minimize skin damage, ensure that the improvised tourniquet is at least two inches wide.
a. Gather Materials for Making a Tourniquet.
(1) Tourniquet band. You need a band of strong, pliable material that is at least two inches wide when folded and will retain this width after being tightened. A folded muslin bandage (usually called a cravat), a folded handkerchief, or a folded strip of clothing will do. A belt, rope, strap from LBE (load bearing equipment), roller gauze, or a torn sleeve can also be used. Do not use wire or shoestrings as a tourniquet band. A wide tourniquet will protect the tissue beneath the tourniquet when it is tightened. If a very narrow tourniquet is used, the nerves and blood vessels beneath the tourniquet may be seriously damaged.
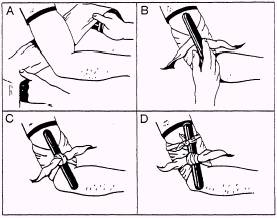
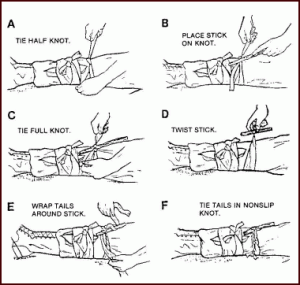
(2) Rigid windlass. A rigid windlass is needed to tighten the tourniquet band. A windless device can be made by placing seven or eight tongue depressors together, one on top of the other, and wrapping tape around the tongue depressors. You can make this device and keep it in your aid bag. If you do not have such a windlass, a strong rigid object can be used as shown in figures 5-20 and 5-21.
(3) Securing materials. Additional material is needed to secure the rigid windlass once the tourniquet band has been tightened. A piece of cloth or cravat similar to the tourniquet band can serve as securing material.
b. Select the Tourniquet Site. Select a site two to four inches above the edge of the wound or amputation site.
(1) If the wound or amputation site is in the upper arm or thigh, select a site that is two to four inches above the edge of the wound or amputation site.
(2) If the wound or amputation is below the elbow or knee, initially select a site two inches above the edge of the wound or amputation site. If an improvised tourniquet applied below the knee or elbow is unsuccessful at stopping the bleeding, apply a second tourniquet two to four inches above the joint (knee or elbow). Do not remove the first tourniquet until the second tourniquet has been applied.
CAUTION: Do not place a tourniquet over a joint or over a fracture site.
c. Apply the Tourniquet.
(1) Place the tourniquet band material around the tourniquet site.
(2) Tie the band with a half-knot (the same as the first part of tying a shoe)
(3) Place the windlass on top of the half-knot.
(4) Tie a full knot (square knot) over the windlass.
(5) Twist the windlass (figure 5-21) either clockwise or counterclockwise until the tourniquet is tight and the bright red bleeding has stopped. Bright red blood is from a severed artery. Generally, darker blood is from a vein. Dark blood may continue to ooze even after the tourniquet has been properly applied. There should be no pulse below the tourniquet.
(6) Wrap a piece of securing material, such as a cravat or torn strip of clothing, around the limb. Then wrap the ends of the material around one end of the windlass so that the windlass is secured and the tourniquet band will not unwind.
NOTE: Tape from your aid bag can be used to secure the windlass instead of a strip of material or cravat.
(7) Tie the tails of the securing material in a nonslip knot.
5-11. MARKING THE CASUALTY
Write a “T” and the time of application on the casualty’s forehead with a pen, the casualty’s blood, mud, or other substance. The “T” alerts medical personnel that a tourniquet has been applied.
5-12. DRESSING AN AMPUTATION
After the tourniquet has been applied to an amputation of the arm or leg, place a dressing made of soft, absorbent material over the end of the stump and secure the dressing with bandages. The dressing will help to prevent additional contamination of the wound and will also help to protect the wound from additional injury.


Leave a Reply