The key here is that these are individual fighting positions and not bunkers or machine gun nests. These are the sorts of combat defensive positions troops in the field can construct quickly and efficiently. these positions will typically utilize nothing more than the material available and should be built to blend in with the local surroundings. The information came from the FM 7-8, if you are interested in additional reading.
While in the field at basic training I loved the way an entire company of roughly 250 soldiers-in-training could become invisible during the daylight hours with their pup tents dropped and covered with foliage, and the way we used native materials to make our fighting positions invisible.
If you have experience in this area then use this reference materiel as a refresher; if this is new to you, then use this material for it’s terminology and as a stepping stone in your combat knowledge preparations.
Some things to consider are to always use material from behind your position to conceal it, not from the front; the longer you are there the more position improvement you will utilize to enhance your cover and concealment; and if you have multiple occupied fighting positions set them up as to provide an interlocking field of fire for the enemy.
Jon
071-326-5703 (SL1) – Construct Individual Fighting Positions
Note: When you first move into battle, there may be little or no time to prepare a position.
1. Prepare a hasty fighting position.
a. Select a hasty fighting position that-
(1) Is behind whatever cover is available.
(2) Provides frontal protection.
(3) Allows you to shoot to the front and at an oblique angle.
(4) Is in a small depression or a hole that is at least half a meter (18 inches) deep.
Note. The term “hasty position” does not mean there is no digging.
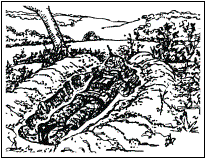
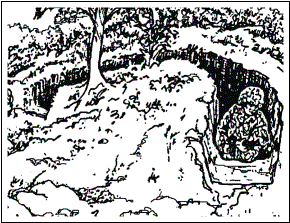
b. Improve your position with whatever time is available by digging or scraping out a prone shelter that will give you some protection (figure 071-326-5703-1).
Figure 071-326-5703-1. Hasty fighting position
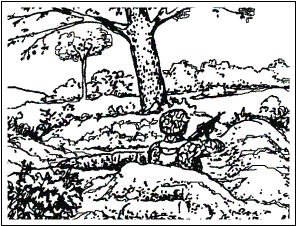
2. Prepare a one-man fighting position (figure 071-326-5703-2).
Figure 071-326-5703-2. One-man fighting position
Note. This type of position allows flexibility in the use of cover. The hole only has to be long enough for you and your equipment. You must be able to shoot to both the front and oblique from behind frontal cover. It does not provide the security a two-man position does.
a. Obtain position location and sector of fire from your leader.
b. Put in sector-of-fire stakes.
c. Partially clear a field of fire within your sector.
d. Dig a hasty hole for minimum protection, being careful not to destroy natural camouflage around your position.
e. Save grass clumps for use as camouflage later.
Note. At this stage of construction, you should be able to fight effectively from the position if there is a surprise attack.
f. Dig in, shaping the hole to fit the natural cover available.
Note. Depending on the size and shape of the frontal cover, you may not be able to dig a rectangular hole.
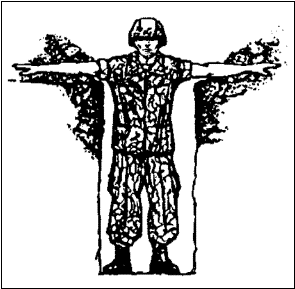
(1) Make the hole armpit deep (figure 071-326-5703-3).
Figure 071-326-5703-3. Fighting position armpit deep
Note. Frontal cover is important so you can shoot without exposing your head to enemy fire. Ideally, you will have a natural parapet, such as a tree, mound, rock, or stump that will blend with the surrounding terrain available for frontal cover.
(2) Use the dirt from your hole to build a parapet that–
(a) Provides frontal cover with at least 45 centimeters (18 inches) of earth between you and the enemy if a natural parapet is not available.
(b) Is high enough to cover your head.
(c) Is far enough in front of the hole to allow for elbow rests and sector stakes.
(3) Modify your position on steep terrain by digging out firing ports at each end of the hole so the ground between the firing ports serves as frontal cover for the position (figure 071-326-5703-4).
Figure 071-326-5703-4. Fighting position on slope
Note. On a steep slope, a soldier in a hole behind frontal cover cannot shoot attackers without being exposed to enemy fire.
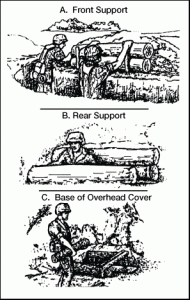
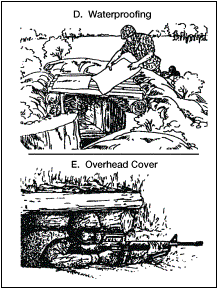
g. Save remaining dirt for use as flank, overhead, and rear cover later (figure 071-326-5703-5 and figure 071-326-5703-6).
Figure 071-326-5703-5. Constructing overhead cover (1)
Figure 071-326-5703-6. Constructing overhead cover (2)
h. Dispose of excess dirt.
(1) Carry dirt away from your position.
(2) Camouflage excess dirt.
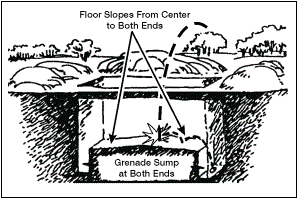
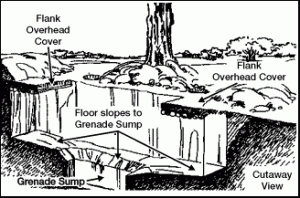
i. Dig two trench-shaped grenade sumps (figure 071-326-5703-7).
Figure 071-326-5703-7. Two trench-shaped grenade sumps
(1) Place one at each end of the position.
(2) Make the trenches as wide as an entrenching tool blade, as deep as the entrenching tool, and as long as the position is wide.
j. Slope the floor toward the sumps (figure 071-326-5703-7).
Note. The slope should be steep enough so a grenade thrown into the position will roll into one of the sumps.
3. Complete clearing the field of fire (see Task 071-331-0852).
a. Clear only what is absolutely necessary.
b. Check the observation and field of fire from inside the position.
4. Save any cut foliage, dirt, or grass clumps to camouflage your position.
5. Construct the fighting position overhead cover that provides the best possible protection from airbursts while allowing you to fight from underneath it.
a. Use logs 10 to 15 centimeters (4 to 6 inches) thick for the supports, base, and top.
b. Construct front and rear supports that are the same height as the terrain.
c. Cover logs with at least 45 centimeters (18 inches) of dirt.
6. Construct flank overhead cover when frontal overhead cover would significantly increase the silhouette of the position, making it vulnerable to detection (figure 071-326-5703-8).
Figure 071-326-5703-8. Flank overhead cover
7. Camouflage your position using available materials (grass clumps, foliage) to make your position blend into surroundings.
8. Check the camouflage by moving 35 meters to the front; if you can spot it easily, you need more work on camouflage.
Leave a Reply