Some time ago I shared an experience of a man I work with getting lost and using a compass to find his way out when the nature of the terrain and a severe blizzard rendered his GPS inoperable. In this article we’ll talk about finding an azimuth. For those unfamiliar with the term azimuth; simply put, it is the direction you are attempting to go. Most of the info here comes straight out of the Soldier’s Manual of Common Tasks, Warrior Skills Level 1; and the rest from personal experience in the form of “personal notes”.
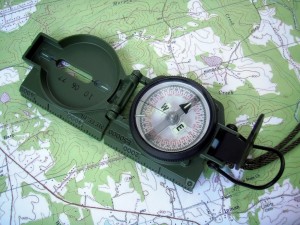
There are two military compasses types you will come across, the M2 compass used for mortars and artillery and such, and the much more common lensatic compass. Your basic run of the mill compass from the surplus store or outdoor sporting goods store will be a lensatic. Make sure your compass flips up and has a sighting slot and mirror in the lid, or it’s not worth your money. While you are not likely to outside of the military world, you may run across a compass that displays mils, like the M2 compass; this level of accuracy is not necessary for simple directional land navigation and degrees will do just fine.
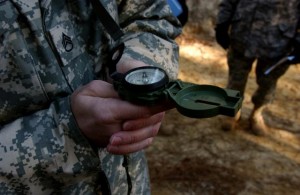
 (Simple civilian lensatic compass)
My next land navigation article will teach you how to get and track a good pace count, and how to read a map. Without those skills or a map you are limited to finding general directions, so at a minimum know direction and distance of the nearest town before you step off on your hunting adventure. Your azimuth might not be degrees, but simply being able to shoot (find) and northerly direction might save your life. Use this article to familiarize yourself and watch for the next articles.
Jon
071-329-1003
Determine a Magnetic Azimuth Using a Lensatic Compass
Conditions: Given a compass and a designated point on the ground.
Standards: Determine the correct magnetic azimuth to the designated point within 3 degrees using the compass-to-cheek method and within 10 degrees using the centerhold method.
Performance Steps
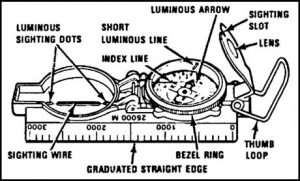
1. Read your compass (figure 071-329-1003-1).
Figure 071-329-1003-1. Lensatic compass
a. Use the floating dial to determine the direction in which you are pointing your compass.
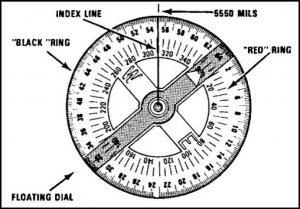
b. Use the outer, black ring of numbers and tick marks for finding direction in mils (figure 071-329-1003-2).
Personal note: if you are new to land navigation do not fool around with mills!
Figure 071-329-1003-2. Lensatic compass floating dial
STP 21-1-SMCT 18 June 2009 071-329-1003 3-233
Performance Steps
c. Use the inner red ring of numbers and tick marks for finding direction in degrees.
(1) There are 360 degrees or 6400 mils in a circle. These are marked with a tick mark every 5 degrees or 20 mils. However, not every tick mark is numbered. You will have to determine the number for these lines using the numbers that are shown.
(a) To read direction, point the compass in the direction you want to go or want to determine.
(b) Look beneath the index line on the outer glass cover and estimate to the nearest degree or 10 mils the position of the index line over the red or black scale.
(c) Be careful to hold the compass still so that the dial remains stationary while you are reading the scale.
(2) If you understand these readings and can apply either of the holding and sighting techniques of shooting an azimuth, you will be proficient in performing this task.
2. Shoot an azimuth.
a. Use your compass to determine or follow an azimuth. The arrow on the compass points toward magnetic north. The arrow is also attracted by any mass of metal; for example, a truck, your rifle, your helmet, and even electrical power lines. Thus, be sure you use your compass away from metal objects, so it will not give a wrong reading.
Personal note: if you are carrying metal or a weapon, this can throw off the reading of your compass.
b. Always hold the lensatic compass level and firm when sighting on an object and reading an azimuth.
c. There are two methods of holding the lensatic compass and sighting.
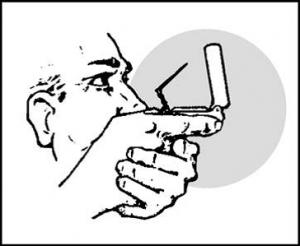
(1) Compass-to-cheek method (figure 071-329-1003-3). To use this method—
Personal note: This is by far the most accurate method I’ve used, but it has its purpose; you may find this method utterly useless if you are in a wooded location.
(a) Open the cover to a 90-degree angle to the base. Position the eyepiece at a 45-degree angle to the base.
(b) Place your thumb through the thumb loop, form a steady base with your third and fourth fingers, and extend your index finger along the side of the compass base.
3-234 071-329-1003 18 June 2009 STP 21-1-SMCT
Performance Steps
Figure 071-329-1003-3. Compass-to-cheek method
(c) Place the hand holding the compass into the palm of the other hand.
(d) Bring both hands up to your face and position the thumb that is through the thumb loop against the cheekbone.
(e) Look through the lens of the eyepiece. If the dial is not in focus, move the eyepiece up or down until the dial is in focus.
(f) Align the sighting slot of the eyepiece with the sighting wire in the cover on the point for which the azimuth is being determined. Look through the lens of the eyepiece and read the azimuth under the index line.
Personal note: if you can’t find something in the distance that is stationary and aligned with your desired azimuth, then you have the option of walking towards that item and not having to reshoot till you get there. If not, recheck you azimuth every few hundred yards/meters.
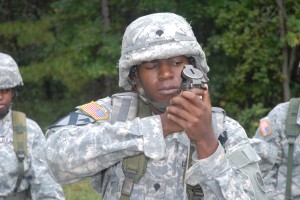
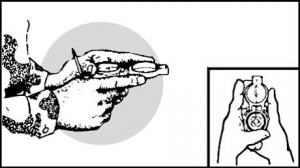
(2) Center-hold method (figure 071-329-1003-4). Use this method only when you do not need a precise direction:
Personal note: I’ve found this method most effective when going through forests, as you can continue to glance down at your compass and stay in the right direction as you weave in and out of trees.
Figure 071-329-1003-4. Center-hold method
(a) Open the compass so that the cover forms a straight edge with the base. The lens of the compass is moved out of the way.
(b) Next, place your thumb through the loop, form a steady base with your third and fourth fingers, and extend your index finger along the side of the compass.
STP 21-1-SMCT 18 June 2009 071-329-1004 3-235
Performance Steps
(c) Place the thumb of the other hand between the eyepiece and lens, extend the index finger along the remaining side of the compass, wrap the remaining fingers around the fingers of the other hand, and pull your elbows firmly into your side. This will place the compass between your chin and your belt.
(d) To measure an azimuth, turn your entire body toward the object and point the compass cover directly at the object. Look down and read the azimuth from beneath the fixed black index line. This method can be used at night.
(e) To keep from going in circles when you are land navigating, stop occasionally to check the azimuth along which you are moving. Also, you can move from object to object along your path by shooting an azimuth to each object and then moving to that object. Repeating this process while you navigate should keep you straight.

Leave a Reply