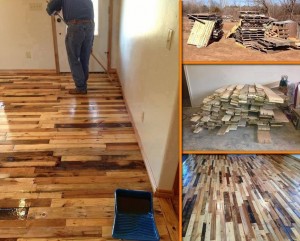
I saw something similar to this on the Living off the Grid page on Facebook. There are a bunch of sites with good info, but I was a fan of this instructional step by step written by Lee Carroll on SFGate.com; How to Use Wood Pallets to Create a Floor. This is yet again one more installment on what can be done to utilize old pallets for something useful.
on a personal note I’ve always loved wood floors, especially with nice thick persion throw down rugs. right now we already have beautiful floor; but if I get the opportunity as we prepare for a move to our new house in the near future I’ll give this a shot and post the photos. If any of you have done something similar i hope you will share it and send me some pictures.
Jon
Wood shipping pallets are usually burned or thrown out after use, but there is value beyond the original purpose. Reusing or repurposing materials that are otherwise discarded is appealing for many, and the salvaged wood from pallets can be used for many projects. One such job is a rustic wood floor. Pallet boards are coarse, knotty and unrefined but still usable. You can install the floor over wood and even vinyl. If there is carpet or tile, remove it and fasten down a layer of 1/2-inch plywood before installing the floor.
1
Pry the pallet boards apart with a claw hammer or pry bar, and remove nails with the claw of a nail puller.
2
Separate the straight boards from the ones that you cannot use.
3
Locate and mark the floor joists. Common joist spacing is 12, 16 or 24 inches apart. Tap a hammer across the floor and listen for a hard, solid sound, which indicates a joist, as opposed to a hollow sound. If you can’t detect a difference, try a stud finder. Turn on the stud finder and pass it across the floor. You will see lights or hear a beep when it detects a stud. Mark each joist location on the floor with a marker or pencil.
4
Roll out 30-pound wood flooring underlayment paper across the floor along the edge of a wall. Staple the underlayment down with 1/2-inch staples, and cut off the excess paper with a utility knife. The location and number of staples is not critical. Roll out the paper again, overlapping the first pass by several inches, and fasten it as before. Repeat until the floor is covered.
5
Practice the layout. Most wood floors run perpendicular to the joists. Each row should be staggered, which means that the ends of each board in one row should not align with the ends in an adjoining row. Arrange the boards to minimize gaps, but leave a 3/4-inch space between the perimeter of the layout and the walls.
6
Begin installing the floor in a corner. You will need two 3-inch flooring nails at both ends of each board, and two more at each joist. Situate all nails no less than 1 inch in from the edges of the board, and predrill the holes for each nail to prevent splitting the boards. Align the first board with the two walls in the corner, and insert 3/4-inch wood flooring spacers between the edges of the board and the walls. Drill pilot holes through the board and into the floor where the nails will go with a power drill and a drill bit that is slightly smaller than the shank of the flooring nails. Drive the nails into the pilot holes.
7
Butt the short end of the next board against the end of the first. Insert spacers between the edge of the board and the wall. Predrill the holes, and drive the nails. Continue until you reach the end of the row where a full board won’t fit. Measure the empty space, mark and cut the last board to fit and nail it down.
8
Begin nailing the next row. In this row, and all remaining rows except the last, you only need spacers where the ends meet the walls, not between boards. Continue fastening the boards until you have nailed every row except the last.
9
Determine whether full boards will fit between the last nailed row and the wall, with room for the spacers. In most cases, the last row requires trimming. If they fit, insert spacers between the edges of the boards and the walls, and fasten the last row. If not, measure the width of the space, transfer those measurements to the remaining pallet boards and trim the boards with a circular saw or a table saw. Insert spacers, and fasten the trimmed boards.
10
Place the tip of a nail-set tool on one of the flooring nails. Hit the nail set with a hammer to drive the head of the flooring nail beneath the surface of the board by approximately 1/8 inch. Sink every nail in the floor the same way.


Leave a Reply