 The truth is there is no one solution for every person; and bags should suit the purpose as well as the back packer. If you are going on a day trip then you probably don’t have to be overly concerned; but if you are bugging out, or just going back packing, here are some things to consider when procuring a back pack.
If you are curious, some of this article comes from personal experience but the majority is from articles in Boys Life and REI; links are below to the original source material. Both sites are great sources for reference material.
Internal or External
 This is the default argument for most when discussing back packs: internal vs. external frames. But the truth is, there is so much more to consider beyond the location of the frame.
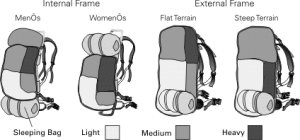
External frames packs are those with a framework on the outside. These old-school-style packs are the best choice if you’ll be hiking mostly on groomed trails carrying lots of weight. They’re especially good at transferring the load so you can hike in a more comfortable upright stance. They’re also about half the cost of an internal frame pack, which has its support hidden inside like a skeleton.
Internal frame packs are usually more form-fitting, so they are better for guys who’ll be hiking rugged trails that require freedom of movement and balance. Most internal frame packs have one huge compartment with a couple of zippered access points, whereas external frame packs usually have lots of smaller compartments that make organization easier. You can also easily attach extra gear – such as a sleeping bag or fishing rod – to the frame.
Ultralight devotees who like to hike fast and light might choose a frameless pack or a climbing pack where the frame is removable for weight savings.
Trip Length and Capacity
Below are some general guidelines for which pack sizes generally work well for warm weather back packing at varying lengths. Colder weather trips will typically require a larger pack, while ultralight backpackers may choose to go smaller than the recommendations here.
Weekend (1–3 nights; 35–50 liters)
Efficient packers using newer, less-bulky gear can really keep things light on 1- to 3-night trips by using a pack in this range. Be aware that packing light requires self-discipline and careful planning. If you can pull it off, though, the light-on-your-feet rewards are fantastic.
Multiday (3–5 nights; 50–80 liters)
These are the most popular backpacking packs sold, and they’re an excellent choice for warm-weather trips lasting 3 or more days. 50–80 liter packs are also used for backcountry skiing, for day trips, overnighters and sometimes 2-night trips.
Extended-trip (5+ nights; 70 liters or larger)
Extended trips of 5 days or more usually call for packs of 70 liters or larger. These are also usually the preferred choice for:
- Winter treks lasting more than 1 night. Larger packs can more comfortably accommodate extra clothing, a warmer sleeping bag and a 4-season tent (which typically includes extra poles).
- Adults taking young children backpacking. Mom and Dad wind up carrying a lot of kids’ gear to make the experience enjoyable for their young ones.
Backpack Fit
Once you’ve chosen the type of backpack you want, the next step might be to work with a sales specialist to expertly fit you to your pack.
The right fit is one that offers:
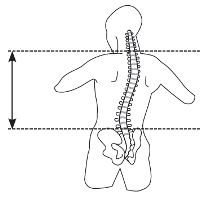
- A size appropriate for your torso length (not your overall height).
- A comfortably snug grip on your hips.
 You can also use the assistance of a friend to gage the correct back pack fit. To do so, you’ll need a friend and a flexible tape measure.
- Have your friend locate the bony bump at the base of your neck, where the slope of your shoulder meets your neck. This is your 7th cervical (or C7) vertebra. Tilt your head forward to locate it more easily. This is the top of your torso length.
- Place your hands on top of your hip bones (also known as your iliac crest), with fingers pointing forward, thumbs in back. This is the “shelf” on which your pack will rest. The middle of an imaginary line drawn between your thumbs is the bottom of your torso length.
- Using the tape measure, your friend should measure the distance between the C7 and the imaginary line between your thumbs. Be sure you stand up straight when being measured. You now should have your torso length.
Use your torso length measurement to find your best pack size. Generally, manufacturers size their pack frames something like this:
- Extra Small: Fits torsos up to 15 ½”
- Small: Fits torsos 16″ to 17½”
- Medium/Regular: Fits torsos 18″ to 19½”
- Large/Tall: Fits torsos 20″ and up
Determine Your Hip Size
While less important than torso length, your hip measurement is useful to know. It’s especially helpful if you are considering a pack that offers interchangeable hipbelts.
Take your tape measure and wrap it around the top of your hips. The correct measurement is along the “latitude line” that radiates out from your belly button to your sides and the high points of your hip bones. This is often lightly higher than where your pants sit, so your hipbelt measurement may differ from your pants waist size.
A properly positioned hipbelt will straddle your hips about an inch above and below that latitude line, wrapping around the 2 pointy pelvic bones on the front of your body.
Torso Length
Some packs are available in multiple sizes, from extra small to large, which fit a range of torso lengths. These ranges vary by manufacturer and by gender. Check the product specs tab for size details of a specific pack.
Other packs may feature an adjustable suspension, which can be modified to fit your torso, especially if you’re in between sizes. The drawback: An adjustable harness adds a little weight to a pack.
Waist Size
The majority of a backpack’s weight, 80% or more, should be supported by your hips.
Backpack hipbelts usually accommodate a wide range of hip sizes, from the mid-20 inches to the mid-40 inches.
People with narrow waists sometimes find they cannot make a standard hipbelt tight enough and need a smaller size. Some packs offer interchangeable hipbelts, making it possible to swap out one size for another.
Women-Specific Backpacks
These are engineered specifically to conform to the female frame. Torso dimensions are generally shorter and narrower than men’s packs. And hipbelts and shoulder straps are contoured with the female form in mind.
Youth-Specific Backpacks
These typically offer smaller capacities and include an adjustable suspension to accommodate a child’s growth. Women’s backpacks, with their smaller frame sizes, often work well for young backpackers of either gender. So do small versions of some men’s packs.
Additional Backpack Fit Adjustments
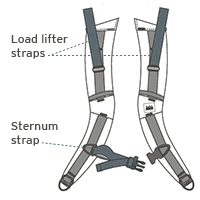
 Load lifter straps are stitched into the top of the shoulder straps, and they connect to the top of the pack frame. Ideally, they will form a 45° angle between your shoulder straps and the pack. Kept snug (but not too tight), they prevent the upper portion of a pack from pulling away from your body, which would cause the pack to sag on your lumbar region.
Sternum strap: This mid-chest strap allows you to connect your shoulder straps, which can boost your stability. It can be useful to do so when traveling on uneven cross-country terrain where an awkward move could cause your pack to shift abruptly and throw you off-balance.
Backpack Accessories
Pack fabric interiors are usually treated with a waterproof coating. Yet packs have seams and zippers where water can seep through, and the fabric’s exterior absorbs some water weight during a downpour.
The solution is a raincover, which could be a plastic garbage bag (cheap but clumsy) to a more customized packcover. If you expect rain on your trip, this is a good item to carry. An alternative: bundling gear internally in waterproof “dry” stuff sacks. Lightweight dry sacks can be a better option in windy conditions; strong gusts have the potential to abruptly peel a cover right off a pack.
Nearly all packs today offer an internal sleeve into which you can slip a hydration reservoir (almost always sold separately) plus 1 or 2 “hose portals” through which you can slip the sip tube.
Additional Considerations
Ventilation can be a drawback of internal-frame designs. Much of the pack rides on your back, cutting airflow and accelerating sweaty-back syndrome. Designers have addressed this in a variety of ways—ventilation “chimneys” built into back panels, for example.
A few packs have engineered a suspended mesh back panel, sometimes called “tension-mesh suspension.” This is a trampoline-like design where the frame-supported packbag rides along a few inches away from your back, which instead rests against the highly breathable mesh.
Padding: If you’re using a lightweight pack with a fairly minimalistic hipbelt and lumbar pad, you can encounter sore spots on your hips and lower back. If this is the case for you, consider using a cushier hipbelt.
Attachment points: If you frequently travel with an ice axe or trekking poles, look for tool loops that allow you to attach them to the exterior of the pack. Rare is the pack that does not offer at least a pair of tool loops.
http://www.rei.com/learn/expert-advice/backpack.html
http://www.rei.com/learn/expert-advice/backpacks-torso-hip-size.html
http://boyslife.org/outdoors/ask-the-gear-guy/3239/internal-or-external-frame-on-backpack/

Leave a Reply